DATACAP+
The DATACAP software is configured using a typical Windows .ini configuration file. When starting the DATACAP software for the first time, the supplied standard configuration file is being copied from the installation directory to the application data directory.
Make sure you are editing the configuration file in the application data directory, not the default configuration file in the installation directory.
In general, you will find the configuration file in the application data directory under C:\ProgramData\AGOLUTION GmbH\DATACAP-PLUS\DATACAP-PLUS.ini. Depending on which operating system version is being used, this directory may differ. For this reason, it is advisable to check the Event Viewer to figure out the expected configuration file position in the file system (see Installation).
In order to start the configuration process use any text editor to open the configuration file DATACAP-PLUS.ini.
Please note that the DATACAP service needs to be restarted to make sure all file modifications made to the DATACAP-PLUS.ini configuration file, have been accepted.
Please find an example configuration file below:
[Common]
Port = 8082
EnvironmentCount = 2
EnvironmentListing = 1

[Environment1]
Code = PROD
LicenseKey = CF040B312BF04BA74.....E599053B6FF5EA09F8FD3547D
NAVWebserviceURI = http://127.0.0.1:7047/Dynamics NAV/WS/
NAVWebserviceName = Handheld
NAVDefaultCompanyName = CRONUS AG

[Environment2]
Code = TEST
LicenseKey = CF040B312BF04BA74.....E599053B6FF5EA09F8FD3547D
NAVWebserviceURI = http://127.0.0.1:7047/Dynamics NAV TEST/WS/
NAVWebserviceName = Handheld
NAVDefaultCompanyName = CRONUS AG
The DATACAP-PLUS.ini configuration file consists of a general section ([Common]) and one or more environment sections ([Environment1], [Environment2]).
Environments 🔗︎
The goal of the configuration is to connect DATACAP to one or more Dynamics NAV databases using Dynamics NAV web services (SOAP). DATACAP can be connected to any number of Dynamics NAV databases. For each Dynamics NAV database, a so-called environment must be configured in DATACAP.
End Customer Example 🔗︎
Two Dynamics NAV databases are configured for one Dynamics NAV end customer:
- a test database
- a productive database
In this case it is recommended to configure two environments in DATACAP. The first environment is connected to the productive database and the second one is connected to the test database of Dynamics NAV. The two DATACAP environments should then be appropriately named as follows:
| Environment Name | Access to Environment | Linked to Dynamics NAV Web Service |
|---|---|---|
| Prod | http://IP-Adresse/Prod/ |
http://127.0.0.1:7047/Dynamics NAV/WS/ |
| Test | http://IP-Adresse/Test/ |
http://127.0.0.1:7147/Dynamics NAV TEST/WS/ |
Microsoft Partner Example 🔗︎
There are configured three Dynamics NAV databases for one Microsoft partner:
- a customer1 database
- a customer2 database
- a customer3 database
In this case, there are three environments configured in DATACAP:
| Environment Name | Access to Environment | Linked to Dynamics NAV Web Service |
|---|---|---|
| Customer1 | http://IP-Adresse/Cust1/ |
http://127.0.0.1:7047/Cust1/WS/ |
| Customer2 | http://IP-Adresse/Cust2/ |
http://127.0.0.1:7147/Cust2/WS/ |
| Customer3 | http://IP-Adresse/Cust3/ |
http://127.0.0.1:7247/Cust3/WS/ |
The following two subchapters
describe the necessary steps that must be taken for each database/environment in Dynamics NAV and DATACAP.
Section Common 🔗︎
In the general section [Common] basic configurations are made.
Property Server Name 🔗︎
You can specify the server name via the Server Name property. If this property has not been specified yet, DATACAP automatically determines and uses the server name.
If the network server cannot be reached via server name, it is appropriate to enter the server’s IP address as property value.
Property Port 🔗︎
The Port property can be used to determine the port on which the integrated web server will receive requests. If the configuration value has not been specified, DATACAP uses port 8082.
You should use the HTTP standard port 80 if no other web server (IIS, Apache, etc.) has been installed.
If you are using a port that is already being used by another application, an error message will appear in the Event Viewer or in the Windows command line:
Failed to start the Web server: “Could not bind socket. Address and port are already being used.”. Could not bind socket. Address and port are already being used.
Property EnvironmentCount 🔗︎
Property EnvironmentListing 🔗︎
Section Environment 🔗︎
Property Code 🔗︎
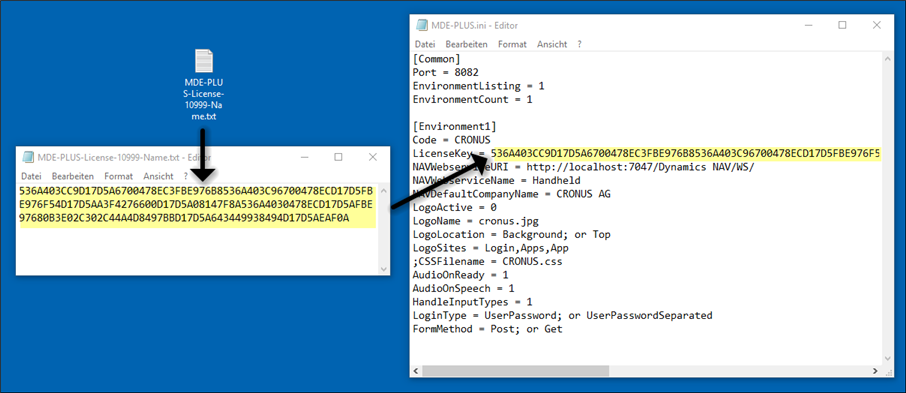
Property LicenseKey 🔗︎
The LicenseKey property is used to define the license key for the environment. If there has no or no valid license key been stored, the environment is running in Demo mode.
You are provided the license key by your Dynamics NAV partner in a license file (DATACAP-PLUS-License-XXXXX-XXXXXX.txt). Please open the license file using any kind of text editor and copy the whole license file content into the LicenseKey property.
Property NAVWebserviceURI 🔗︎
Use the NAVWebserviceURI property to specify the URI to the Dynamics NAV SOAP web service. The format is as follows: http://<Server>:<Port>/<ServerInstance>/WS/. For example: http://127.0.0.1:7047/Dynamics NAV/WS/. For more information, see Microsoft’s Web Service URIs article.
Property NAVWebserviceName 🔗︎
Use the property NAVWebserviceName to set the name of the web service via which the SOAP web service can be reached. The value must be Handheld!
Property NAVDefaultCompanyName 🔗︎
Use the property NAVDefaultCompanyName to define the name of the client that DATACAP should communicate with. Please note that the name is case sensitive.
Property Indicator 🔗︎
Property LogoActive 🔗︎
The LogoActive property is used to manage whether there is a logo integrated on your device pages. Select value 1 if a logo is to be displayed.

If a logo is to be output, the additional properties LogoName, LogoLocation and LogoSites must be set.
Property LogoName 🔗︎
The LogoName property defines the graphic file name. The graphic file needs be located in the Application data directory.
In our example, the graphic file is called CRONUS.JPG:

In this example, the LogoName property must be set to the value CRONUS.JPG.
Property LogoLocation 🔗︎
The LogoLocation property is used to specify whether the logo should be displayed at the top (Value: Top) or in the background (Value: Background).
Property LogoSites 🔗︎
The LogoSites property is used to define on which pages the logo is to be displayed. Values can be combined and must be separated by a comma.
| Value | Description |
|---|---|
Login |
Logo is displayed on the login page |
Apps |
Logo is displayed on the application overview page |
App |
Logo is displayed on within the applications |
Usually, the logo is only displayed on the login page.
Property CSSFilename 🔗︎
Property AudioOnReady 🔗︎
Property AudioOnSpeech 🔗︎
Property HandleInputTypes 🔗︎
Property SelectInputValueOnFocus 🔗︎
Using the property SelectInputValueOnFocus, you can manage whether the value in an input field is to be automatically marked completely as soon as the input field receives the focus. This makes it easier to overwrite the value, as the new value can be typed in directly without having to delete the old value first.
Example 🔗︎
The following C/AL code serves as an example:
Screen.Header('Correct dimensions');
Screen.Input('Height','Height (cm)',FORMAT(ItemUnitOfMeasure.Height));
Screen.Input('Width','Width (cm)',FORMAT(ItemUnitOfMeasure.Width));
Screen.Input('Length','Length (cm)',FORMAT(ItemUnitOfMeasure.Length));
Screen.button('Save','Save');
Screen.Button('Esc','Cancel');
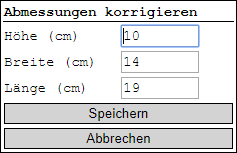
If the property is deactivated (SelectInputValueOnFocus = 0), the following screen is displayed on the MDE device:
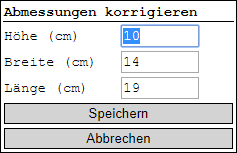
If this property is activated (SelectInputValueOnFocus = 1), the following screen is displayed on the MDE device:
Property LogHTMLToFile 🔗︎
In order to analyze errors within DATACAP applications more easily, it is useful to log generated HTML pages displayed on the MDE devices in the server file system. The HTML pages are logged if the setting LogHTMLToFile is set to the value 1.
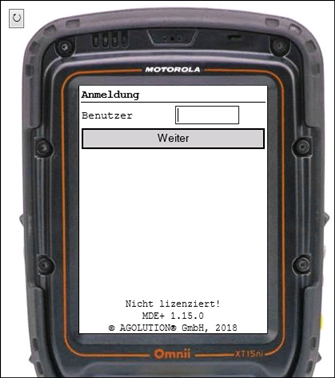
Property LoginType 🔗︎
This property specifies how user name and password are being entered or scanned.
-
UserPasswordUser name and password are entered together on one page:
-
UserPasswordSeparatedUser name and password are entered on two separate pages:
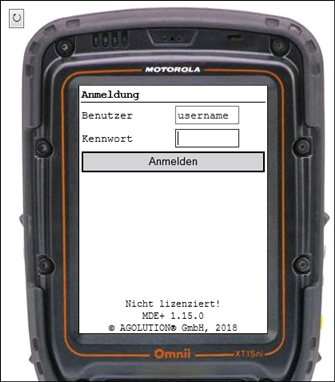
Each input must be confirmed by
ENTER.